 I originally started this blog as a way to get pictures of my models online for use in my LGS forums and to share with friends. This was back when I was playing AT-43, Confrontation and Malifaux. Once I started 40k I stopped posting up those army painted pics for the most part.
So I'd like to go back pull out all my models from the last 4 years and do a series of posts on how my painting has changed in that time. Its one thing to go back to old posts and see a change but a rundown may help all newer painters as they strive to up their game. Another motivator is I finally got myself a small light-box with backdrops for taking better pictures of my models.
So let us begin.
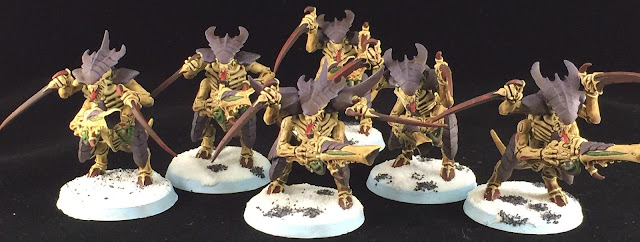
My first army in 40k is Tyranids. The concept that I as the player took on the role of a character in the narrative of 40k, that of the hive mind, really got me into this army. Also the highly organic nature of the models lent itself well to my heavy use of wash on models at this time in my painting growth. I picked them up sometime around February or March of 2011. I went for a hybrid paint scheme. borrowing from two existing fleets. Leviathan and Behemoth. I used the Leviathan chitin purples with the bone of the Behemoth.
 I also started using a great product for getting whole armies done. Army Painter colored primers and dip. For these I used the skeletal bone primer. for the base coat then came back in and painted up the plates purple. The green and pinks I diluted down the paint making almost a wash to drop into the recesses, worked well over the fairly light skeletal bone. The only neat technique I did on these models was on the claws. I painted them black then did what I term "wet brushed" the red from the tip down the length. Wet brushing is like dry brushing but using a still wet paint with a little more on the brush. Doing so allowed the red to streak down the length of the claw. Normally not something you would want to do but I wanted to mimic the color shift seen in horn on oxen. Only rather than black to white, going from red to black.
Now in using the dip method I started by following the steps listed and actually would dip the whole model in and do the whipping back and forth to remove excess dip. After shattering a couple models and breaking a few more off the base I stepped away from following the army painter tutorials. Instead I picked up a 1" wide synthetic brush from the wall-mart and instead brushed on the Army Painter dip. I would let them sit about 30 minutes then go back and brush off the excess dip from the bottom of the models. I found this was both less messy, less destructive to models and much easier on me to do. (swinging 40+ models really hard was very hard on my shoulders after an hour.)
All said it took me the better part of 2-3 months to build and paint this army to completion for some local tournaments. Considering the time frame I was painting up 8 model crews in before this (2-4 weeks). The simplification in painting style helped to speed up painting dramatically and the organic models really allowed the dip method to shine.
Next time, monstrous Tyranids!


No comments:
Post a Comment