Ultima Segmentum,
Sable System
Astopathic distress
beacon received. Civil unrest across system. PDF unable to suppress rising tide
of civilian violence. Source unknown. System Governor requesting Astra
Militarum support.
Inquisitional
Addendum,
Astropathic message
tainted with strong psychic spore. Vanus Temple agent assignes Primus level
Chaotic cult, or incursion, as the source of increasing violence. Inquisitional
Agents report people vanishing in the midst of night. Cult abductions or
victims of the rising random violence? Imperial Tithe met at 95% last cycle.
Projected disastrous decrease in Tithe levels for next cycle.
Overt support, grant
Militarum aid to system Governor. Additionally, subversively task Inquisitional
agents to locate Chaos cult activity. Activate Adeptus Astartes forces to
eliminate threats discovered.
Vanus agent assigned
to monitor situation and provide updates.
Sable
System Narrative Campaign:
Starting soon a narrative bi-weekly campaign to take place at Crossroads games
run for you by me. As I am unable to attend the events I won’t be partaking but
GM’ing the campaign to provide new missions each game turn as well as
individual and faction bonuses or deficiencies based on previous turns. As a
GM’d narrative campaign not all missions/games will be balanced. Please
understand that the goal is to have fun with your opponent not at the expense
of your opponent, and overall the missions will be balanced over the course of
the campaign.

Organization:
I am going to need someone else on site to help promote and bring players into
the campaign as I’m just too far away to do that. That said I am happy to help
GM the campaign and provide the narrative and missions for it. So anyone that
would like to help out by being a face in the store to help organize “day of”
and to point people at the missions and information would be great. If this
gets rolling and people are heavily participating so “it is known” then that
will be fine to.
That said players do not need to be organized into teams.
Preferably same factions will not play each other, nor imperial on imperial but
I’d rather people get in good games than hold anyone to this. As such we won’t
be doing any formal teams but rather I will be tracking each player’s progress
along with their faction. Thus each faction will be tracked as a whole as will
the Imperium as a whole and these things will be forged into the narratives of
each successive stage of the campaign. Some factions may get bonuses, some
players may. It will be tailored each stage based on the results of your
individual games and as a whole.
I’m initially thinking stages will be every couple weeks to
allow people to easily get a game in for the campaign but still be able to play
other games as well. If the group wants a faster or slower pace just come to a
decision on Wednesday and let me know. I’ll adapt as needed.
Army build rules:
Standard to Crossroad games for most missions, but for your participation in
the campaign I request that you please play the same primary faction through
the campaign. All 40k factions are
allowed and will be provided more narratives once the composition of factions is
known.
Game Reporting:
Please provide game results, and details as requested with each mission to the
Crossroad forum.
Campaign Stage 1:
Armies:
Army size for this game is up the players for each game. I would recommend
something in the 1700-200 range as the mission is going to force you together
and casualties will be high.
Deployment:
Players should mutually agree or roll off to determine who the defender is and
who the assaulter for this mission.
Place 4 objectives, one in each corner of the defenders deployment
zone.
Defender deploys first within an area that is 18” from both
table sides and 18” of the opponent’s table side. Defender is allowed one free
Fortification. Choose one including upgrades up to a point cost of 100 points.
You may also choose a fortification worth more than 100 points but any weapons
are non-functional, if it has no weapon then the building AV value is reduced
by 1. Defender may reserve as normal.
Attacker deploys no units and automatically goes first. All
units are placed in deep strike reserve. Even units that normally cannot or are
required to deploy by some other method. You may choose to either have the unit
deploy turn 1, or be rolled for as normal starting turn 2. This is decided by
not deep striking the unit on turn 1. Units that normally can deep strike will
only scatter 1d6 instead of the normal 2d6. Also any units arriving turn 1 that
mishap, automatically go into ongoing reserve rather than rolling on the mishap
table.
Primary Objective:
+3 points per objective marker held at the end of the game.
Secondary Objective:
+1 Point: Slay the Warlord
Attacker gains +1 point per unit in defenders deployment
zone at end of game. (Unit in this case is defined the same as for kill points
below, thus a squad with an IC in the zone is worth two points.)
Defender gains +1 point per kill point earned game end.
Attacker units that have not been deployed are counted as lost.
Missions Special
Rules:
Variable Game Length, Night Fight turn 1. Modified Reserves (see deployment)
Mission Wrap up:
Please provide player names and factions played. Along with scores and role as
Attacker/Defender. Also any notes about moments of notes during the game and
acts of great heroics by characters from either side.
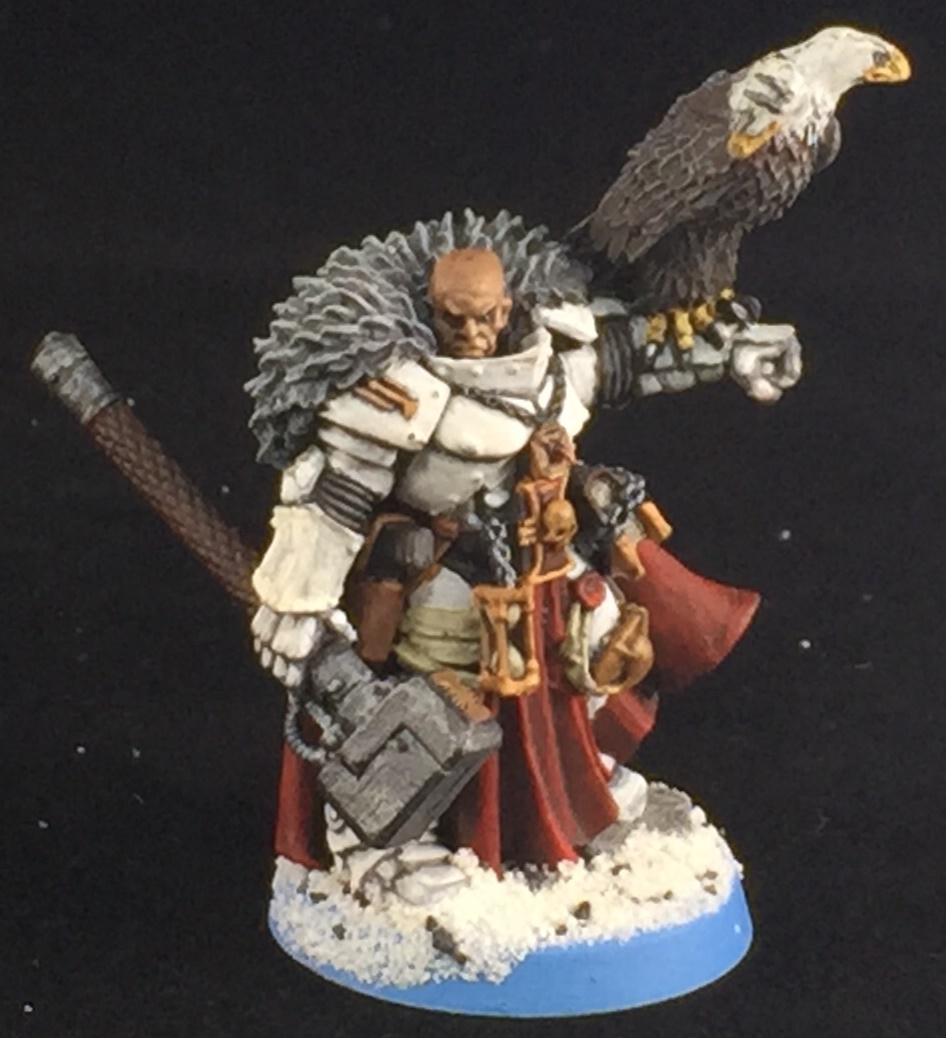
 Now for something completely different. Not really, this is the Marine side of my 2013 Standish Standoff list. My Marines are blood angel paint scheme but being fairly Codex Astartes generic they are also my vanilla marine army. As such I have some special characters and units that are vanilla marine painted up to match my Blood Angel force. Hence Tiggy here with the Blood Angel shoulders. I really liked how deep blue the armor came out. Makes for a great librarian blue. The red skull on the back really isn't a good choice. Should have gone metallic or bone. Its just to stark against the blue and draws the eye to it rather than complementing army color composition by providing another Blood Angel color tie in. His eyes are great as well. The blue soft glow effect gives him that unearthly look to really strike home the fact that he is a psyker. I practiced with the list a fair amount before the event and had a pretty good feel for it. However one of my constant practice opponents played 6th Ed Eldar and I had yet to beat him in game. I had come close but hadn't yet punched his ticket. Turns out as fate would have it he was my round 1 pairing at the Standoff. History it seems was not to be overturned and I lost that game. It was a great match up and we had a fun game. Some early shooting failures though spelled the doom of my list. What should have been able to kill 2.5 wave serpents a round given averages took 3 rounds to kill 1. Unfortunately for my next opponents this meant I hit the bottom tables, and hit them hard. I won my next two games but lost to many points game 1 to get to far in the standings. I did come out in 4th place overall. Not to shabby after a first round loss. It was a great day in the end.

 Here is my first painted Marin Tactical squad all painted up. Its also one of the first time I've used decals on my models. They came out pretty good but the yellow ones especially needed a little post application paint assistance to keep the coloring solid. The red hues on these models came out really well. I followed the GW Blood Angel paint scheme for armor only modifying ti a little bit by using null oil wash rather than the crimson wash. I've found that although it can be tough to clean up afterwords as black wash can get streaky on red, it gives really strong color depth and is worth the extra time.


 Perhaps my favorite painted unit of the whole army. First time I had ever built or used bikes in 40k. Being a command squad for the Blood Angels I felt these bikes needed to be binged up a lot to make them truly veterans of the Blood Angels. I used a number of the Dark Angel bike bits to get wings on the bikes. I removed the Dark Angel icons from those parts but felt the wings on the sides would work really well. Grav had just come out, but the bits where very hard to get a hold of for a reasonable price. I opted to use an alternate gun and paint it up with the green power source of grav. I really liked the way all the details on these models came out. They just look great on the table and great up close. I used the Death Company shoulder pads rather than decals to further "bling" them up. The golden helms came out fairly well. Perhaps a little flat in coloring without the depth of coloring I would like but still fairly decent with the wash.


 Last Marine unit was a Thunderfire cannon. As seen from last years standoff list I already have a nice Techmarine painted up. Again I didn't want to drop some $50+ dollars on a fincast Thunderfire cannon. I opted for the Mantic space dwarf model instead. I had some older metal servitors sitting around and modified them to take the gunner seat and removed the dwarf. Nothign like using a third party model to make you realize just how good the GW models are. The details on this where soft and just a pain to paint and bring out. I muddled thru it though and cut a number of corners. Not a centerpiece model to be sure just a tabletop quality paint job. Servicable to be sure, but not the most crisp nor well highlighted.