
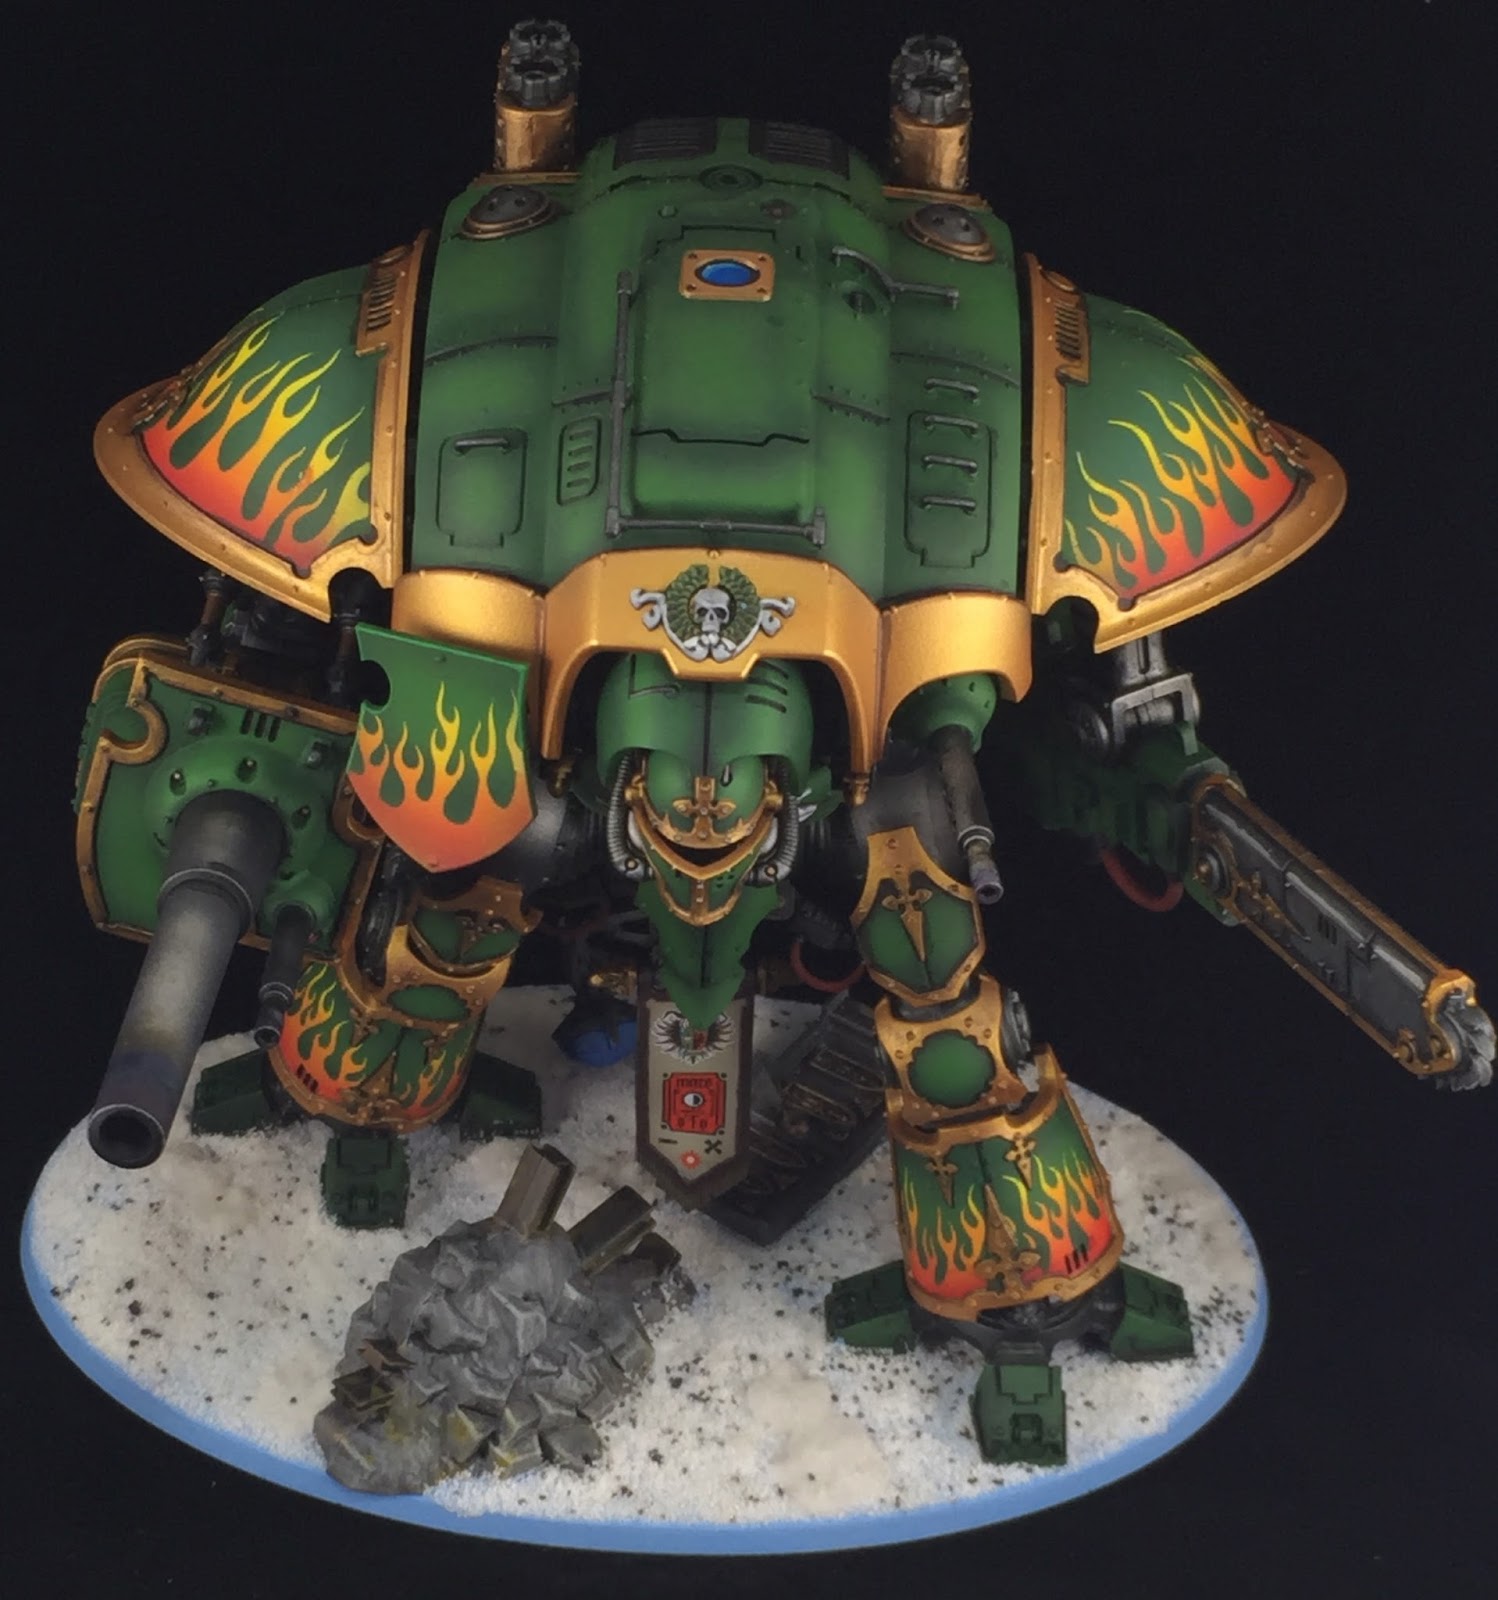
This last winter I worked up a centerpiece model for this years Standish Standoff. After the success of airbrushing my Blood Angel Land Raider I opted to finally work on my Knight Titan kit I picked up back when they got released. I worked on this model once more in a partial assembly. Most the armor plates where left off, and the arms and torso where also left off for painting. I once more used pre-shading to add color depth to the large flat armor plating sections. I do this by adding thin lines of black down first over the primer along joint lines and edges of the armor. As cited in previous posts I like to prime my models grey then airbrush on my first colors. As I tend to pre-shade this allows me to darken or lighten areas before putting my first coat down.

For the green I use a trio of colors starting with a darker green base that I then progressively lighten up by adding the lighter color centrally to each plate avoiding more and more of the perimeter as I layer on the colors. AS seen best int he kneecaps this allows for a wonderful transition from nearly black edges up to a much lighter green center. For those sections that have flames I actually started by blending in an red to yellow over the whole of the plate section before even doing pre shading. I do this over a white base coat to help brighten the colors. Once this transition piece is down I lay in some airbrush flame templates I got from Kick Starter (
Anarchy Models) some months back. These are made from a window cling like material so they model and stick to the model while still being easy to pull up and not leaving any residue behind. Once the template is firmly in place I proceeded to pre-shade and paint on the green armor layers as described above. Then I simply peel and remove the templates. If they are not pushed on firm enough you can get some leaking of paint under them and will need to hand brush little fixes. So be diligent and really get them affixed the first go around.

Once all the green was done I proceeded to paint on all the metallic trim and base coat the metallic coloring for the limbs. As always I first drop on a ocher style yellow down everywhere I am painting gold. This allows me to get the gold on in 1 thin coat rather than several thin coats the inevitably end up being to thick. I then washed all the metallic in null oil being careful not to get any on the painted green armor that is already nicely blended. This left me with a hand full of details across the model to pick out and paint up including eye lenses banners and mechanicum logo's. I also add some heat scoring to the end of the cannon barrel using a trio of colored GW washes. Helps to break up the simple metallic tube that is a gun barrel. I use a purple, blue and flesh shade to achieve this effect applying them in rings along the barrel length and blend them together where they meet.

Lastly I added some decals to the banner. I used micro-sol and micro-set to apply them and they went on great. This is one of my first uses of decals on a model and the extra time I took to learn how to use these two decal aids really paid off. I will likely be using more decals on models in the future as my freehand skills are lacking. I can't draw diddly and even my stick figures look bad after all. So this ends my running series 4 years of 40k painting. We are all caught up with what I painted over my first 4 years in this game. Moving forward model painting posts will be more sporadic as I get them done but hopefully will continue to show improvement in the painting quality.

So with all that I leave you with this parting shot of encouragement, 10 years ago I started to paint miniatures. These are those first few models. I thought I was the man with these. I have come a long way through no special classes or learning. I just kept doing the hobby I loved and kept striving to improve upon it. So when you show up to a big event and see some outrageously great looking armies around you, just remember they all started somewhere like you and once had models that looked no better.
 This last winter I worked up a centerpiece model for this years Standish Standoff. After the success of airbrushing my Blood Angel Land Raider I opted to finally work on my Knight Titan kit I picked up back when they got released. I worked on this model once more in a partial assembly. Most the armor plates where left off, and the arms and torso where also left off for painting. I once more used pre-shading to add color depth to the large flat armor plating sections. I do this by adding thin lines of black down first over the primer along joint lines and edges of the armor. As cited in previous posts I like to prime my models grey then airbrush on my first colors. As I tend to pre-shade this allows me to darken or lighten areas before putting my first coat down.
  For the green I use a trio of colors starting with a darker green base that I then progressively lighten up by adding the lighter color centrally to each plate avoiding more and more of the perimeter as I layer on the colors. AS seen best int he kneecaps this allows for a wonderful transition from nearly black edges up to a much lighter green center. For those sections that have flames I actually started by blending in an red to yellow over the whole of the plate section before even doing pre shading. I do this over a white base coat to help brighten the colors. Once this transition piece is down I lay in some airbrush flame templates I got from Kick Starter (Anarchy Models) some months back. These are made from a window cling like material so they model and stick to the model while still being easy to pull up and not leaving any residue behind. Once the template is firmly in place I proceeded to pre-shade and paint on the green armor layers as described above. Then I simply peel and remove the templates. If they are not pushed on firm enough you can get some leaking of paint under them and will need to hand brush little fixes. So be diligent and really get them affixed the first go around.
  Once all the green was done I proceeded to paint on all the metallic trim and base coat the metallic coloring for the limbs. As always I first drop on a ocher style yellow down everywhere I am painting gold. This allows me to get the gold on in 1 thin coat rather than several thin coats the inevitably end up being to thick. I then washed all the metallic in null oil being careful not to get any on the painted green armor that is already nicely blended. This left me with a hand full of details across the model to pick out and paint up including eye lenses banners and mechanicum logo's. I also add some heat scoring to the end of the cannon barrel using a trio of colored GW washes. Helps to break up the simple metallic tube that is a gun barrel. I use a purple, blue and flesh shade to achieve this effect applying them in rings along the barrel length and blend them together where they meet.
  Lastly I added some decals to the banner. I used micro-sol and micro-set to apply them and they went on great. This is one of my first uses of decals on a model and the extra time I took to learn how to use these two decal aids really paid off. I will likely be using more decals on models in the future as my freehand skills are lacking. I can't draw diddly and even my stick figures look bad after all. So this ends my running series 4 years of 40k painting. We are all caught up with what I painted over my first 4 years in this game. Moving forward model painting posts will be more sporadic as I get them done but hopefully will continue to show improvement in the painting quality.
  So with all that I leave you with this parting shot of encouragement, 10 years ago I started to paint miniatures. These are those first few models. I thought I was the man with these. I have come a long way through no special classes or learning. I just kept doing the hobby I loved and kept striving to improve upon it. So when you show up to a big event and see some outrageously great looking armies around you, just remember they all started somewhere like you and once had models that looked no better.

No comments:
Post a Comment